So you want to relay your favorite shoutcast stream with your ubuntu VPS, but don’t know where to start? Here’s a quick guide to relaying DNAS v1.9.8 shoutcast server streams.
Step 1: Download the sc_serv_1.9.8 file from this thread, or from another website (afterdawn, shoutcast.com, etc)
Step 2: Unzip the .zip and .tar, and FTP them to your server. I use /var/shoutcast for my folder root, but that might not be the most secure. You could use /home/shoutcast or anything really.
Step 3: If you are going to run the server as root (not recommended) you can skip this. Otherwise, make an account (ex. shoutcast) and place the files into a folder in their home.
Step 4: Edit the sc_serv.conf using nano or vi. Edit any and all settings that you find fit. Here is what I have mine set as.
; SHOUTcast Distributed Network Audio Server configuration file
; Copyright (C) 1998-2004 Nullsoft, Inc.
; All Rights Reserved.
; Last modified Mar 17 2004
; If you want to manage multiple configurations, just copy
; this file to another name, and run sc_serv with that name
; such as:
; sc_serv.exe sc_leet.conf
; ***************************
; Required stuff
; ***************************
; MaxUser. The maximum number of simultaneous listeners allowed.
; Compute a reasonable value for your available upstream bandwidth (i.e. if
; you have 256kbps upload DSL, and want to broadcast at 24kbps, you would
; choose 256kbps/24kbps=10 maximum listeners.) Setting this value higher
; only wastes RAM and screws up your broadcast when more people connect
; than you can support.
MaxUser=100
; Password. While SHOUTcast never asks a listener for a password, a
; password is required to broadcast through the server, and to perform
; administration via the web interface to this server. This server should
; consist of only letters and numbers, and is the same server your broadcaster
; will need to enter in the SHOUTcast Source Plug-in for Winamp. THIS VALUE
; CANNOT BE BLANK.
Password=************
; PortBase. This is the IP port number your server will run on. The
; value, and the value + 1 must be available. If you get a fatal error when
; the DNAS is setting up a socket on startup, make sure nothing else on the
; machine is running on the same port (telnet localhost portnumber — if you
; get connection refused then you’re clear to use that port). Ports < 1024
; may require root privledges on *nix machines. The default port is 8000.
PortBase=8100
; ***************************
; Optional Parameters
; ***************************
; ***************************
; Logging configuration
; ***************************
; LogFile: file to use for logging. Can be ‘/dev/null’ or ‘none’
; or empty to turn off logging. The default is ./sc_serv.log
; on *nix systems or sc_serv_dir\sc_serv.log on win32.
; Note: on win32 systems if no path is specified the location is
; in the same dir as the executable, on *nix systems it is in the
; current directory.
LogFile=sc_serv.log
; RealTime displays a status line that is updated every second
; with the latest information on the current stream (*nix and win32
; console systems only)
RealTime=1
; ScreenLog controls whether logging is printed to the screen or not
; on *nix and win32 console systems. It is useful to disable this when
; running servers in background without their own terminals. Default is 1
ScreenLog=1
; ShowLastSongs specifies how many songs to list in the /played.html
; page. The default is 10. Acceptable entries are 1 to 20.
ShowLastSongs=10
; TchLog decides whether or not the DNAS logfile should track yp
; directory touches. Adds and removes still appear regardless of
; this setting.
; Default is yes
; TchLog=yes
; WebLog decides whether or not hits to http:// on this DNAS will
; be logged. Most people leave this off because the DSP plug-in
; uses http:// calls to update titles and get the listener count,
; which takes up a lot of log space eventually. If you want to
; see people making hits on your admin.cgi or index pages, turn
; this back on. Note that this setting does NOT affect XML stats
; counters for hits to http:// pages.
; Default is no.
; WebLog=no
; W3CEnable turns on W3C Logging. W3C logs contain httpd-like accounts
; of every track played for every listener, including byte counts those listeners
; took. This data can be parsed with tools like Analog and WebTrends, or given
; to third parties like Arbitron and Measurecast for their reporting systems.
; Default is Yes (enabled).
W3CEnable=Yes
; W3CLog describes the name of the logfile for W3C logging. Default logfile is
; sc_w3c.log, in the same directory wherever the DNAS gets started from.
W3CLog=sc_w3c.log
; ***************************
; Network configuration
; ***************************
; SrcIP, the interface to listen for source connections on (or to make relay
; connections on if relaying). Can and usually will be ANY or 127.0.0.1
; (Making it 127.0.0.1 will keep other machines from being able to
; broadcast using your shoutcast server )
SrcIP=ANY
; DestIP, IP to listen for clients on (and to contact yp.shoutcast.com)
; can and usually will be be ANY. If your machine has multiple IP addresses,
; set this to the one you want it to be accessed by.
DestIP=ANY
; Yport, port to connect to yp.shoutcast.com on. For people behind caching
; webproxies, change this to the alternate port (666 is what it might be,
; check www.shoutcast.com if you have problems). Otherwise, leave this at 80.
; We’re actively working on re-opening port 666, but as of release the only
; working port is port 80.
Yport=80
; NameLookups. Specify 1 to perform reverse DNS on connections.
; This option may increase the time it takes to connect to your
; server if your DNS server is slow. Default is 0 (off).
NameLookups=0
; RelayPort and RelayServer specify that you want to be a relay server.
; Relay servers act as clients to another server, and rebroadcast.
; Set RelayPort to 0, RelayServer to empty, or just leave these commented
; out to disable relay mode.
RelayPort=8000
RelayServer=stream1.yourfavoritestream.com
; ***************************
; Server configuration
; ***************************
; AdminPassword. This password (if specified) changes the
; behavior of Password to be a broadcast-only password, and
; limits HTTP administration tasks to the password specified
; here. The broadcaster, with the password above, can still
; log in and view connected users, but only the AdminPassword
; will grant the right to kick, ban, and specify reserve hosts.
; The default is undefined (Password allows control for both
; source and admin)
; AdminPassword=************
; AutoDumpUsers controls whether listeners are disconnected if the source
; stream disconnects. The default is 0.
AutoDumpUsers=0
; AutoDumpSourceTime specifies how long, in seconds, the source stream is
; allowed to be idle before the server disconnects it. 0 will let the source
; stream idle indefinately before disconnecting. The default is 30.
AutoDumpSourceTime=30
; ContentDir specifies the directory location on disk of where to stream
; on-demand content from. Subdirectories are supported as of DNAS 1.8.2.
; Default is ./content, meaning a directory named content in the same directory
; as where sc_serv was invoked from.
; ContentDir=./content
; IntroFile can specify a mp3 file that will be streamed to listeners right
; when they connect before they hear the live stream.
; Note that the intro file MUST be the same samplerate/channels as the
; live stream in order for this to work properly. Although bitrate CAN
; vary, you can use ‘%d’ to specify the bitrate in the filename
; (i.e. C:\intro%d.mp3 would be C:\intro64.mp3 if you are casting at 64kbps).
; The default is no IntroFile
; IntroFile=c:\intro%d.mp3
; BackupFile can specify a mp3 file that will be streamed to listeners over
; and over again when the source stream disconnects. AutoDumpUsers must be
; 0 to use this feature. When the source stream reconnects, the listeners
; are rejoined into the live broadcast.
; Note that the backup file MUST be the same samplerate/channels as the
; live stream in order for this to work properly. Although bitrate CAN
; vary, you can use ‘%d’ to specify the bitrate in the filename
; (i.e. C:\backup%d.mp3 would be C:\backup32.mp3 if you are casting at 32kbps).
; The default is no BackupFile
; BackupFile=C:\intro%d.mp3
; TitleFormat specifies a format string for what title is sent to the listener.
; For example, a string of ‘Justin Radio’ forces the title ‘Justin Radio’ even
; when the source changes the title. You can use up to one ‘%s’ in the string
; which lets you contain the title from the source. For example, if your
; TitleFormat is ‘Justin Radio: %s’, and the source plug-in’s title is
; ‘Billy plays the blues’, then the net title is
; ‘Justin Radio: Billy plays the blues’. Note: only works on non-relay servers.
; The default is no format string.
; TitleFormat=Justin Radio: %s
; URLFormat specifies a format string for what url is sent to the listener.
; Behaves like TitleFormat (see above).
; The default is no format string.
; URLFormat=http://www.server.com/redirect.cgi?url=%s
; PublicServer can be always, never, or default (the default, heh)
; Any setting other than default will override the public status
; of the source plug-in or of a SHOUTcast server that is being relayed.
PublicServer=default
; AllowRelay determines whether or not other SHOUTcast servers will be
; permitted to relay this server. The default is Yes.
AllowRelay=Yes
; AllowPublicRelay, when set to No, will tell any relaying servers not
; to list the server in the SHOUTcast directory (non-public), provided
; the relaying server’s Public flag is set to default. The default is
; Yes.
AllowPublicRelay=Yes
; MetaInterval specifies how often, in bytes, metadata sent.
; You should really leave this at the default of 8192, but the option is
; provided anyway.
MetaInterval=32768
[/spoiler]
The main things that I changed were maxlisteners (set to 100), the passwords, and the relay information.
For the relay, you need the port of the stream, as well as the address. To find this information you must open the listen.pls and find the data in there.
*If you are going to run more than 1 server at a time, you will need to change the portbase. I run my streams at 8100 and 8200.
Now that you have configured your server, ssh in and cd to the appropriate folder. To start the server type
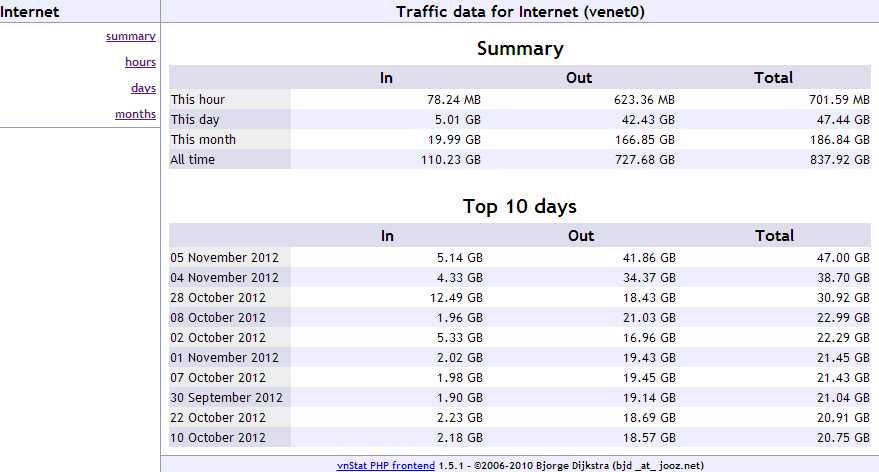
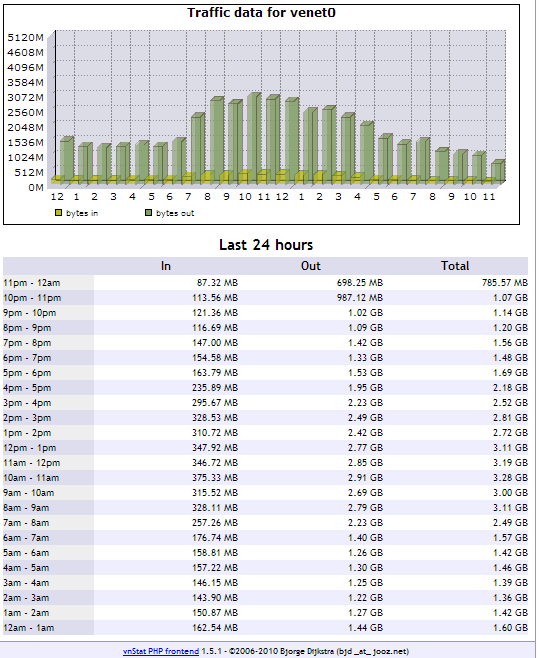
If all goes well, the server will pick up the stream, and start relaying. Shoucast will do some magic, and you will soon be taking some of the load off of the main stream and onto yours. Contact the stream owner ahead of time so you can coordinate reserved slots in their streams.
If you have any questions, please leave them below. Remember, this only works with version 1.9.8!